History of Framework - Developer's Guide
| Version 33 | Current version | |
|---|---|---|
The Bitweaver Framework, consisting of Liberty and Kernel, offers you a lot of functionality. Here we'll try to show how you can make use of that. Business Objects a la LibertyWhich base class?If you want to create your own Business Object, you will probably use LibertyAttachable as base class, as it offers most functionality. Use LibertyContent or LibertyBase when you know what you are doing.LibertyAttachableClasses derived from LibertyAttachable come with this functionality (in addition to features already in LibertyContent):
If all you need is a new data type that contains some formatted text, you might be pretty quick in implementation. Customise this sample and continue with your GUI code (List and Detail Views). Custom fieldsProbably you will want to add some custom fields. This will be some more work, as Liberty won't know about them and we have to handle them ourselves.First think of a place to store the data. We will have to use our own table in the database. To match the liberty data with our own we should use an identifier. content_id is the one provided by liberty, and it will serve us well now. So create a table with two columns, just as shown. Later you will see how Bitweaver automatically creates the table upon package installation.
History functionalityHow can you enable history tracking in Liberty?
LibertyContentLibertyContent is the base for objects to be treated by Liberty. They come with these features:
LibertyBaseLists, sorted and filteredNow let us create a list of resources. Hopefully you already have something in your database so get something to see. As a first, insert this data with your favourite client, or even better with the data pump described below.Now we will write some code that loads your data from the database. It goes to _index.php_ in your package directory. But what? We call a method that does not exist. Unfortunately LibertyAttachable does not come with a method that could easily be there: getList(). And so we will have to create that for ourselves:
Make something visible: The UIProbably you cannot wait to display somethind on the screen. Up to now we had concentrated on your data objects - the model. Bitweaver works with the MVC pattern. Find out more about this pattern in Model View Controller - MVC, but now we make use of the model, create a simple controller and focus on the view.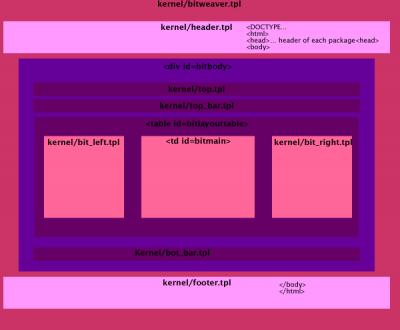 In most cases you write ordinary module code that goes into the main area in the middle. Then you can place any HTML/JavaScript/whatever code in your templates but surround it with the tag , which will look like this: Or you might be creating a module, in which case it is displayed either in the left or right column. In that case surreund your HTML with as shown: Don't use tables to control the position as Bitweaver already takes care for the layout (and that can be changed in the admin menu). If you cannot believe it, read Table_vs_Div. Of course within the element you can use tables to organise your information. List Views
Detail Views
Feedback and ConfirmationUp to now, the answer is to look at the SamplePackage and guess.
Authorisation RequiredUp to now, the answer is to look at the SamplePackage and guess.Menus and ModulesUp to now, the answer is to look at the SamplePackage and guess.Layout assigned module titles and parameters ServicesThe previous section showed how you can add a nice HTML GUI to your code. Now see what can be done behind the scenes.Installation and MigrationThe Database SchemaYour package contributes to Bitweaver. That also is during database creation. To setup the correct tables, privileges and the such make use of the _admin/schema_inc.php_ script. It is called by the Bitweaver package installer during database creation time. The version shown here creates the table for our custom field in the BitResource class, registers the package and installs some privileges.
Data PumpIf you want to populate the database with sample data during the installation process, you have to make use of the data pump.For the easy to use BitResource type, simply create a file named _pump_mypackage_inc.php_ in the bitweaver/install directory with the following content. All it does is fill an array with the data to populate, then loop through that array and feed everything into BitResource::store(). Error/success messages are stored in variables. This file will be called from the Bitweaver installer after the user agreed to populate the database, and afterwards the installer will display the error or success messages. If you have more data or custom fields that need population, simply add them to the array above and you are done. Data FormatNational language charactersWhat encoding should be used for the PHP file? How shall national language characters (at worst the complete unicode character set) be escaped?TimestampsBitweaver is said to use UTC times within the database. What times are used on timestamps in the installer?(MySQL does not support timestamps with timezone information. However the timezone used must be set in the database connection. How is that handled? | The Bitweaver Framework, consisting of Liberty and Kernel, offers you a lot of functionality. Here we'll try to show how you can make use of that. Your Own PackageBusiness Objects a la LibertyWhich base class?If you want to create your own Business Object, you will probably use LibertyAttachable as base class, as it offers most functionality. Use LibertyContent or LibertyBase when you know what you are doing.LibertyAttachableClasses derived from LibertyAttachable come with this functionality (in addition to features already in LibertyContent):
If all you need is a new data type that contains some formatted text, you might be pretty quick in implementation. Customise this sample and continue with your GUI code (List and Detail Views). Custom fieldsProbably you will want to add some custom fields. This will be some more work, as Liberty won't know about them and we have to handle them ourselves.First think of a place to store the data. We will have to use our own table in the database. To match the liberty data with our own we should use an identifier. content_id is the one provided by liberty, and it will serve us well now. So create a table with two columns, just as shown. Later you will see how Bitweaver automatically creates the table upon package installation.
History functionalityHow can you enable history tracking in Liberty?
LibertyContentLibertyContent is the base for objects to be treated by Liberty. They come with these features:
LibertyBaseLists, sorted and filteredNow let us create a list of resources. Hopefully you already have something in your database so get something to see. As a first, insert this data with your favourite client, or even better with the data pump described below.Now we will write some code that loads your data from the database. It goes to _index.php_ in your package directory. But what? We call a method that does not exist. Unfortunately LibertyAttachable does not come with a method that could easily be there: getList(). And so we will have to create that for ourselves:
Make something visible: The UIProbably you cannot wait to display somethind on the screen. Up to now we had concentrated on your data objects - the model. Bitweaver works with the MVC pattern. Find out more about this pattern in Model View Controller - MVC, but now we make use of the model, create a simple controller and focus on the view.In most cases you write ordinary module code that goes into the main area in the middle. Then you can place any HTML/JavaScript/whatever code in your templates but surround it with the tag , which will look like this: Or you might be creating a module, in which case it is displayed either in the left or right column. In that case surreund your HTML with as shown: Don't use tables to control the position as Bitweaver already takes care for the layout (and that can be changed in the admin menu). If you cannot believe it, read Table_vs_Div. Of course within the element you can use tables to organise your information. List Views
Detail Views
Feedback and ConfirmationUp to now, the answer is to look at the SamplePackage and guess.errors, warnings, message text and confirmation dialogs
Authorisation RequiredUp to now, the answer is to look at the SamplePackage and guess.Menus and ModulesUp to now, the answer is to look at the SamplePackage and guess.Layout assigned module titles and parameters ServicesThe previous section showed how you can add a nice HTML GUI to your code. Now see what can be done behind the scenes.Installation and MigrationThe Database SchemaYour package contributes to Bitweaver. That also is during database creation. To setup the correct tables, privileges and the such make use of the _admin/schema_inc.php_ script. It is called by the Bitweaver package installer during database creation time. The version shown here creates the table for our custom field in the BitResource class, registers the package and installs some privileges.
Data PumpIf you want to populate the database with sample data during the installation process, you have to make use of the data pump.For the easy to use BitResource type, simply create a file named _pump_mypackage_inc.php_ in the bitweaver/install directory with the following content. All it does is fill an array with the data to populate, then loop through that array and feed everything into BitResource::store(). Error/success messages are stored in variables. This file will be called from the Bitweaver installer after the user agreed to populate the database, and afterwards the installer will display the error or success messages. If you have more data or custom fields that need population, simply add them to the array above and you are done. Data FormatNational language charactersShort answer: Make sure all your PHP and TPL files are encoded in UTF-8. Apache, PHP and Bitweaver operate on byte streams. Character sequences are just arrays of bytes. So you need not care what character encoding your national special characters are in - as long as the data is supplied by browsers. Per default Bitweaver tells the web browser that UTF-8 is used. Therefore any data presented to the browser is assumed to be UTF-8 (even if it is not which results in garbage) and the browser will send user input encoded in UTF-8. That solves the problem almost completely. There are two items which you will have to look at: Your PHP source and template files. Again, PHP does not assume any encoding on the files, they are just loaded as byte arrays. The PHP code in these files should not contain anything beyond ASCII, but any characters within string literals can. And this data goes untouched through the whole system until it has to be displayed on the screen. As mentioned earlier, the browser will assume all data to be in UTF-8. So you can see garbabe being displayed unless you change the encoding of those characters. Note: I've seen troubles with trimming down text with special chars. The common example is when article gets automaticly cut after the set number of letters, and the rest is placed to the "read more" part. It says letters, but it actually uses bytes to count. It takes 2 bites to encode most non-Latin1 chars, so after trimming sometimes the last letter is presented with only one bite of 2 necessary, and shows in browser as garbage. So until this is fixed somehow, avoid trimming texts by your php files and templates if you use special chars. TimestampsBitweaver is said to use UTC times within the database. What times are used on timestamps in the installer?(MySQL does not support timestamps with timezone information. However the timezone used must be set in the database connection. How is that handled? |